
Developing the Content Workflow System for Programiz Tutorials

At Programiz, one of our daily tasks is to create beginner-friendly programming tutorials that eventually reach out to millions of users all over the world. Behind the scenes, we are also constantly experimenting with different tools and techniques to furnish our products and enhance the user experience.
One such tool we recently developed — called the Content Workflow System — allows us to effectively write, edit, manage, review, and publish programming tutorials on our website.
What could possibly have gone wrong that made us abandon conventional writing tools to develop an entire Content Workflow system? As a matter of fact, this was not our first time trying to do so!
Problems with Conventional Writing Tools
If you are developing a blogging site or any site with similar static web pages, you may have realized that it is a lot of hassle to manually type in HTML for each article post. In today's context, most content writers probably end up using some sort of visual (WYSIWYG) text editor or markdown language to speed up the writing process.
When Programiz first started as a small company, we also used one such rich text editor called CKeditor to write our programming tutorials. This editor would then translate our writings to HTML, and we would publish them directly on our Programiz website.
Our articles usually consist of plain and stylized texts, images, lists, tables, and preformatted code blocks. All of these items are non-fancy HTML elements and are supported by the CKeditor.
Despite this fact, CKeditor had many flaws, which we soon became aware of. These "smart" WYSIWYG editors would sometimes act too smart for our own good — incorrectly formatting special symbols in an already preformatted code block, or bloating HTML with empty paragraph tags. Items that required Programiz-specific HTML structure also had to be typed in manually. This sheer inconvenience compelled us to search for better options.
We wanted a way to automate the Programiz-specific HTML generation process without having the content writers to explicitly follow this semantic every time they wrote an article. Considering that we required a broader level of customization, the next stop at our venture was to start from the ground up and build our very own text editor.
We used Slate.js (a customizable framework for building rich text editors) to create our custom text editor. We shaped this tool to fit our needs, and it worked perfectly for some time.
As we began to scale up our team and programming tutorials over the years, however, we realized that this might not have been the best solution moving forward. One of the main problems with this tool was that it did not provide us with a layer for moderation and article review. So, most of the articles that our content writers previously wrote were only proofread by themselves before publishing. This gave room for mistakes and compromised the quality of our tutorials.
If you were to review some of our old programming tutorials, you would find numerous grammatical and linguistic errors, even though they are technically correct. This went against our founding motto of delivering the best content and choosing quality over quantity. We chose to abide by these principles and dedicated a lot of our time to build a robust Content Workflow System — time we could have used to write bulks of other tutorials.
We were back to square one; we now faced the dilemma of choosing a medium not only to write, but also to review and manage our tutorial articles. This was only possible with a medium that supported sharing with a smooth, real-time collaborative feature.
Since we used it so very often, the only tool that we could think of at that time was Google Docs, a burgeoning web-based word processor by Google. We began experimenting with Google Docs API to convert simple Google Documents into HTML, and it produced decent results. Besides, Google Docs also provided us with a reliable state-of-the-art interface for real-time collaboration and article review (commenting). Subsequently, we decided to develop this idea into a full-fledged content writing tool.
Most of the tutorial articles that you see today on the Programiz website are derived from Google Docs!
Google Docs does not provide us with these customizable features right out of the box. So how did we manage to exploit Google Docs in our favor?
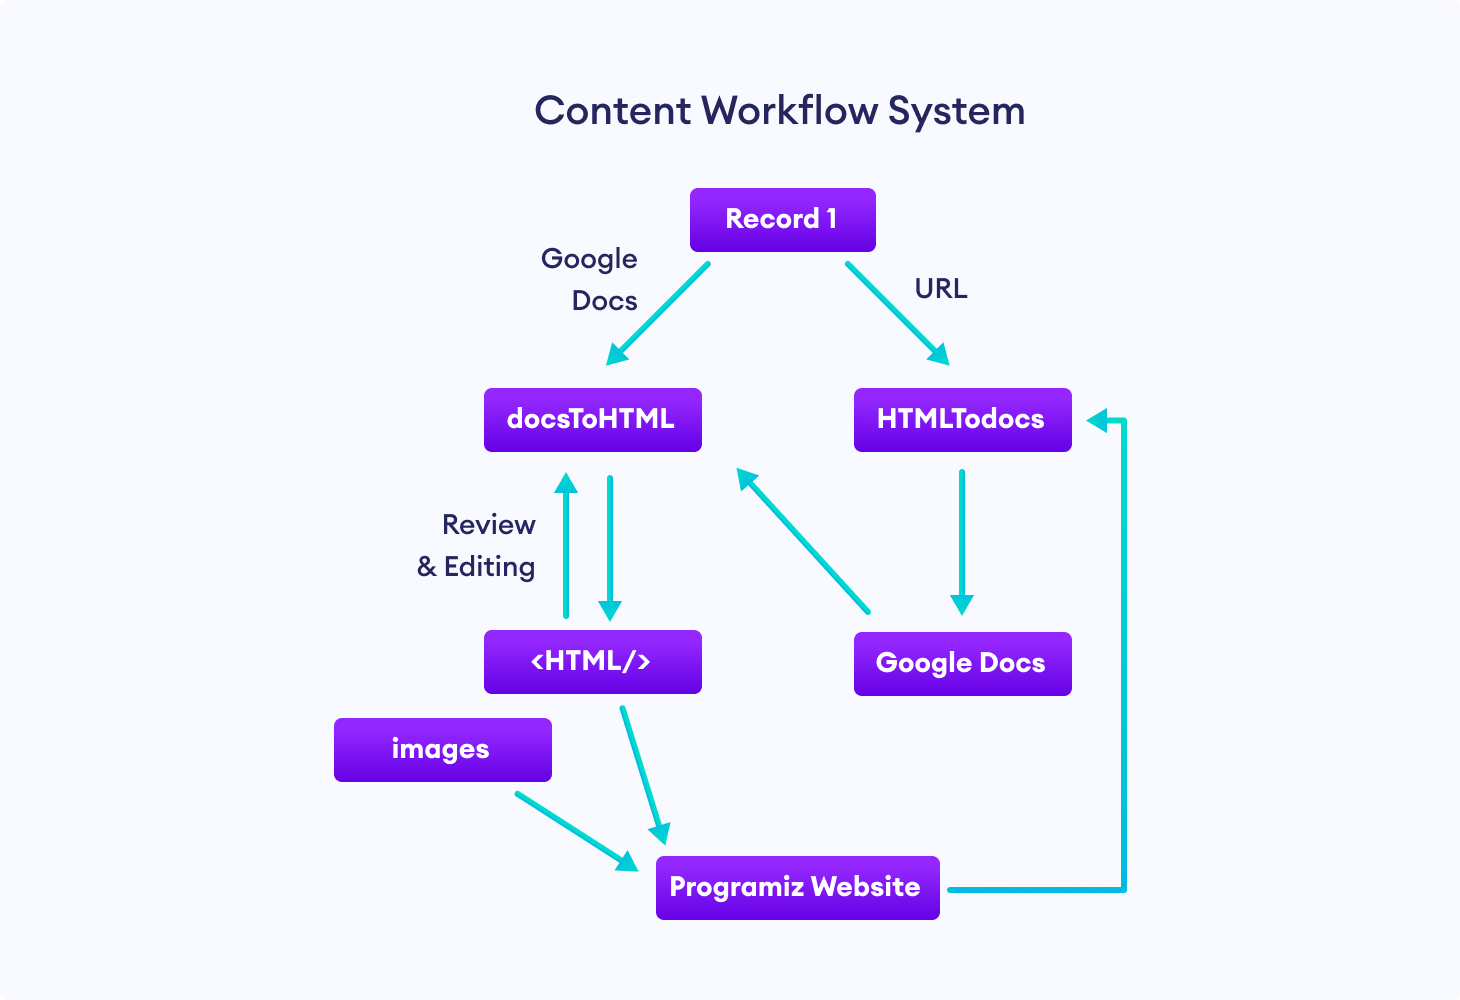
Our Solution: Content Workflow System
docsToHTML: Generating HTML Content from Google Documents
A Google Document comes with all the typical elements that are available in HTML, such as headers, paragraphs, lists, tables, and basic stylizing options (bold, italics, hyperlinks, subscript, superscript).
However, as previously mentioned, there was no implicit way to convert Google Documents into HTML. There were also no third-party libraries to achieve this task. So we decided to build one using Python. docsToHTML is a Python module that converts Google Documents into HTML using Google Docs API.
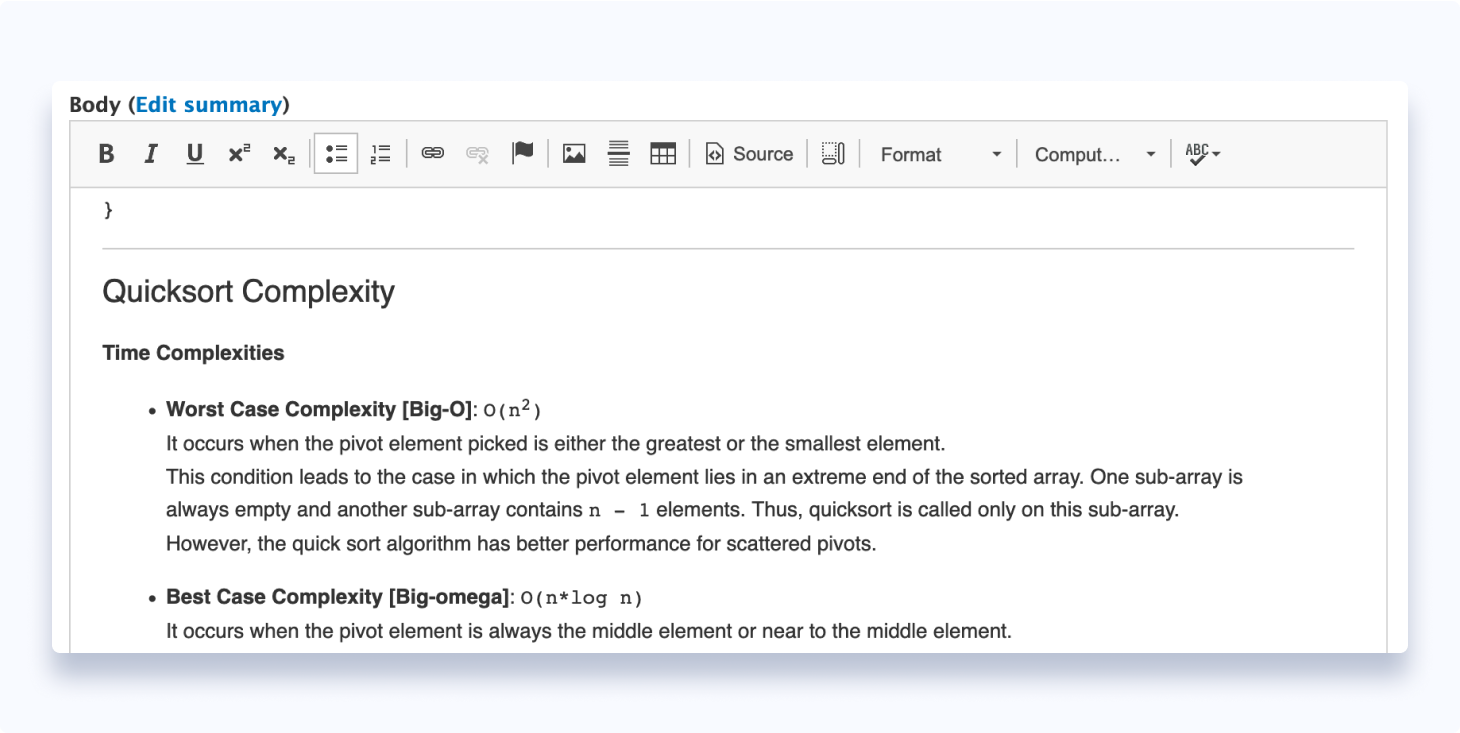
In addition to basic HTML elements, our tutorial articles use other HTML tags for preformatted code blocks, other inline stylings, and note-tips.
These extra elements are not natively available in Google Docs. So we also had to find a way to incorporate our Programiz HTML semantics into the Google Docs interface. By that, I mean we had to find ways to represent these items as Google Docs elements. Then, our Python module could later detect and separate these special elements.
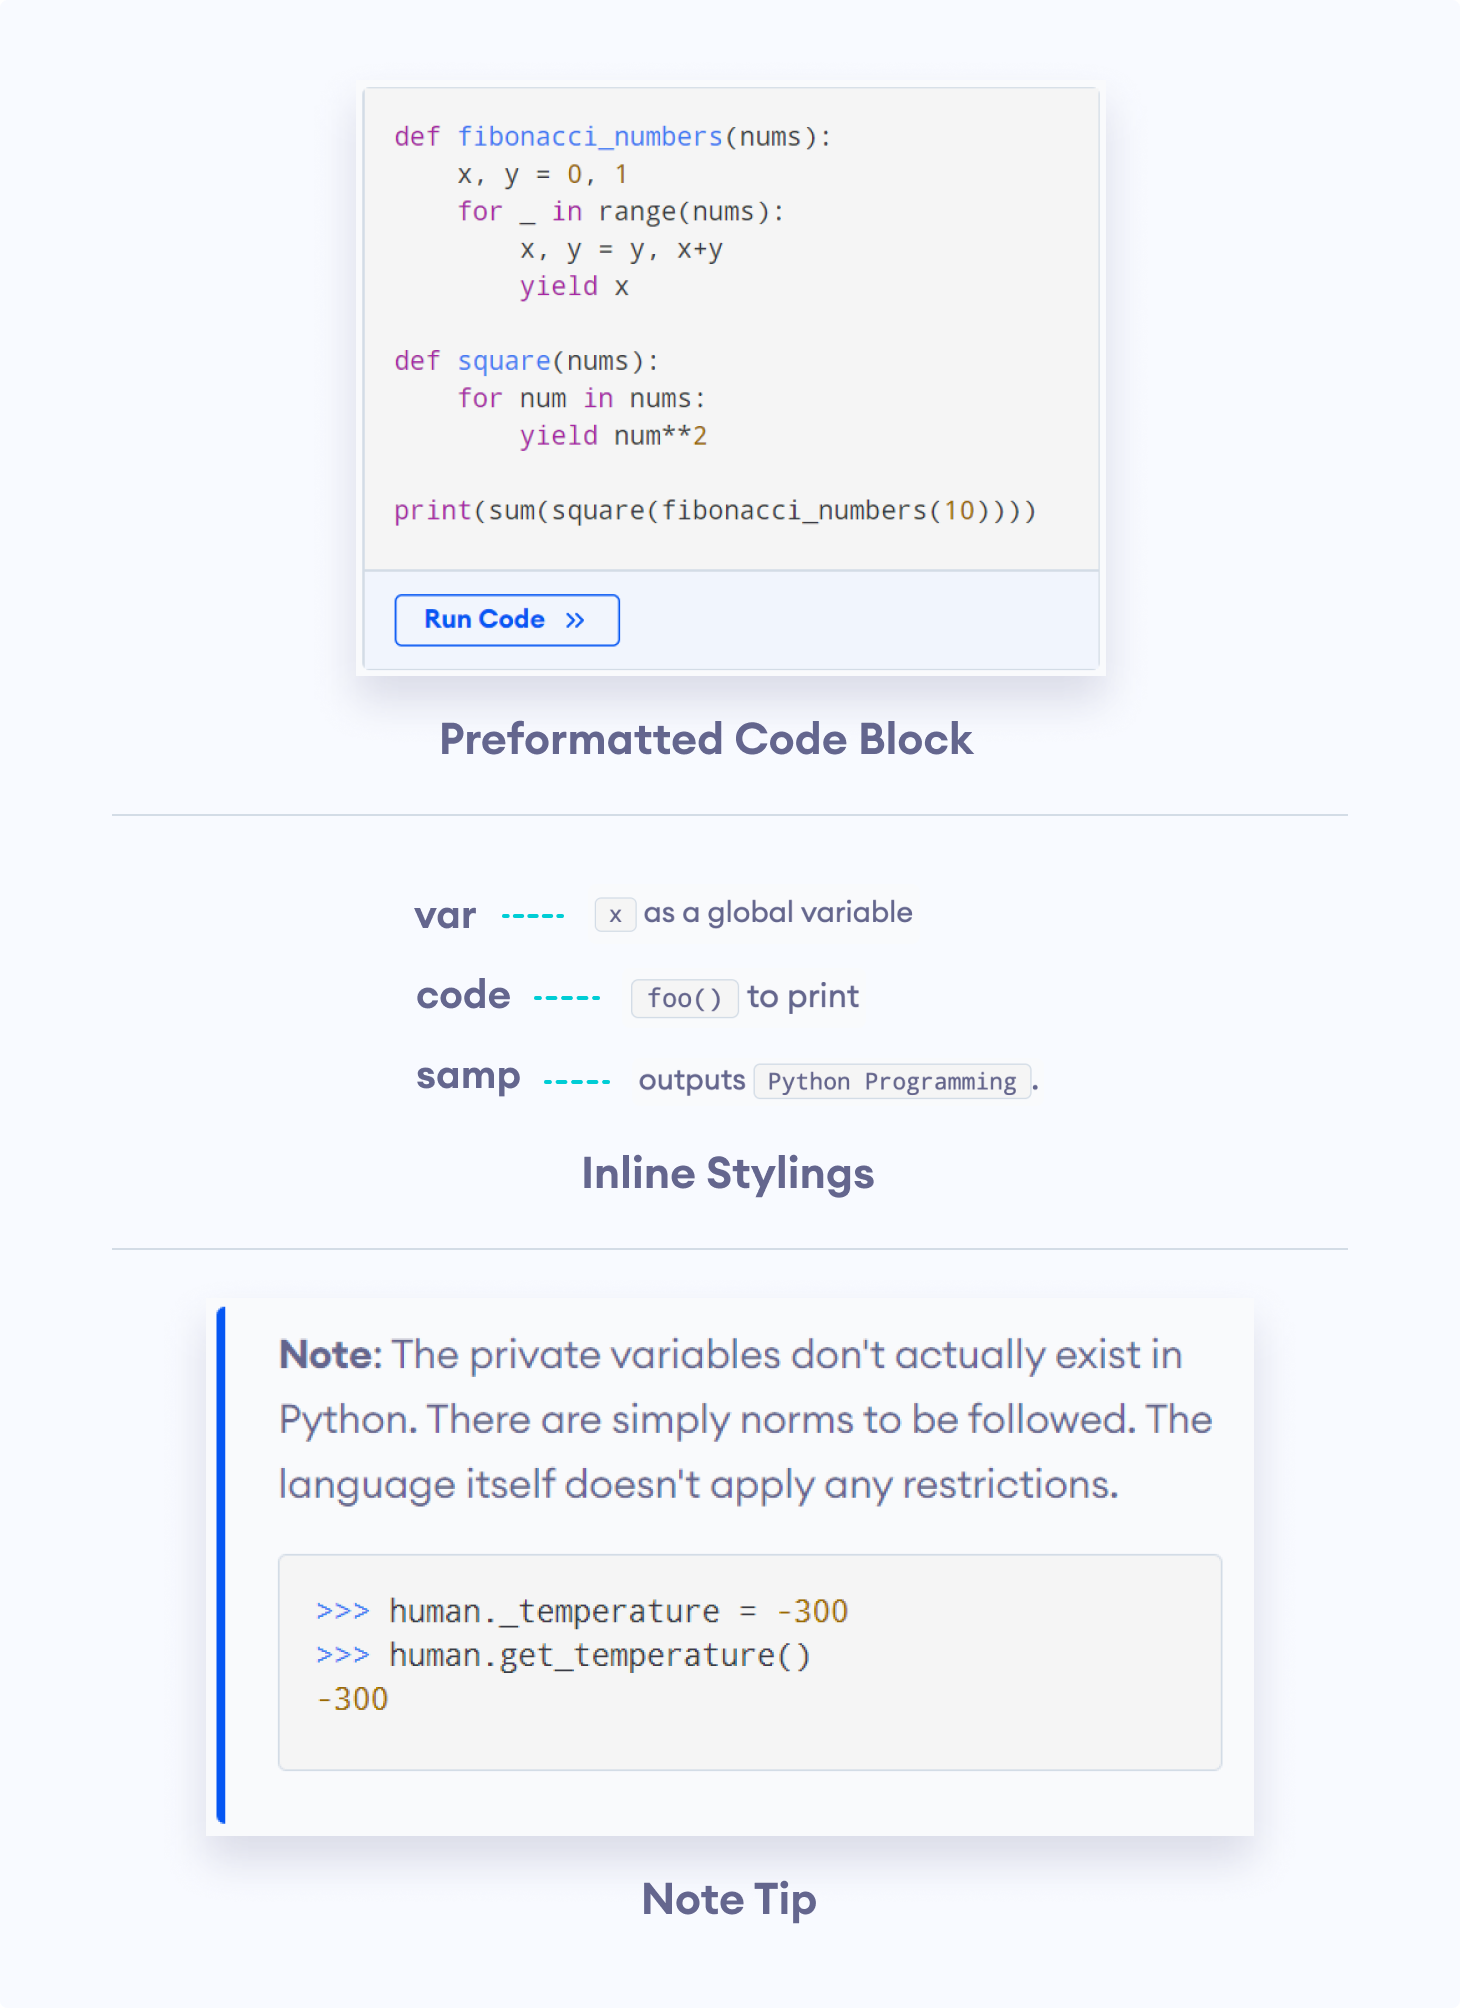
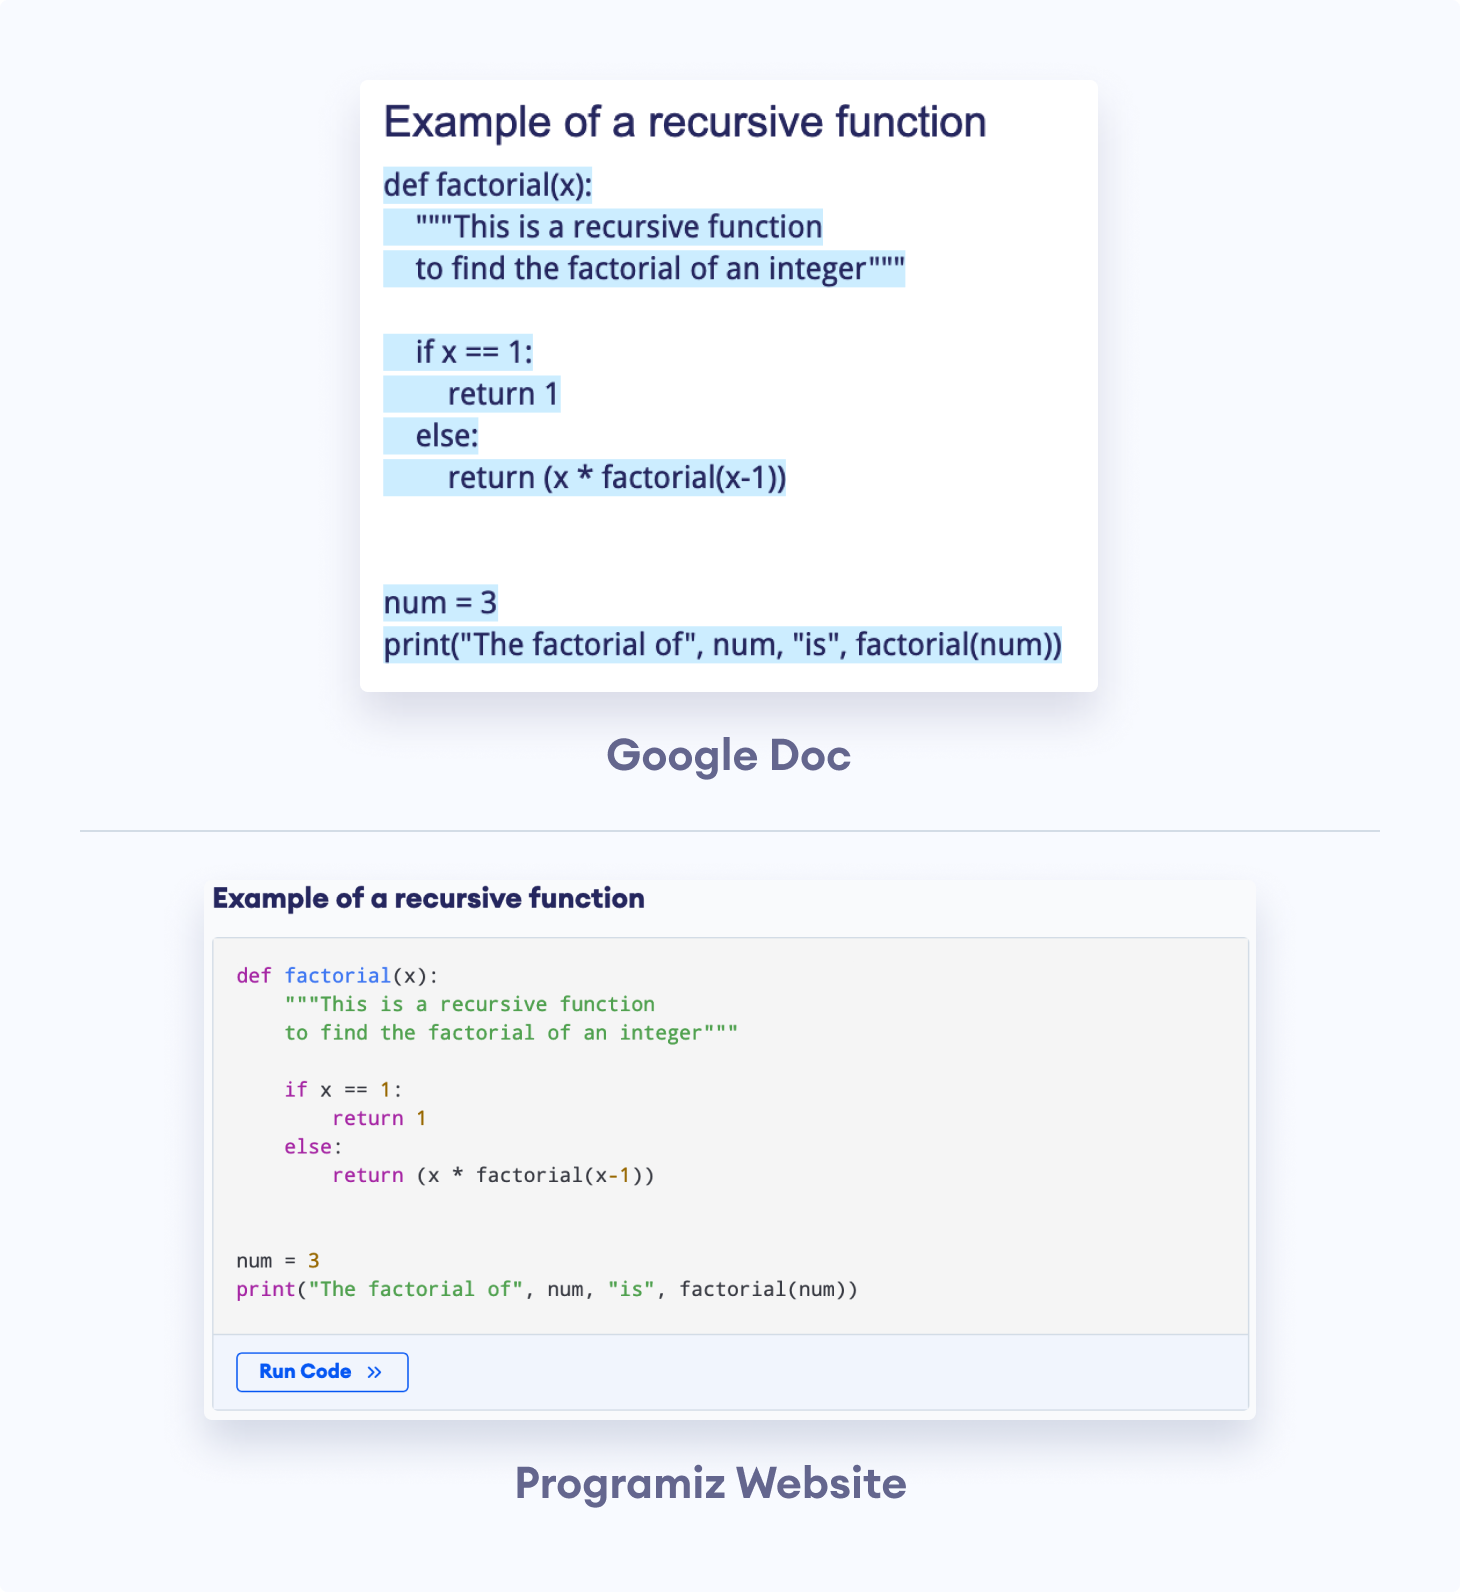
We decided to use a combination of different styling options, like fonts and foreground/background colors, to distinguish these elements. The following image shows one such option for the preformatted code that we mentioned earlier.
Even though this method solved all our problems, remembering all the different styling options for each separate element would be a nightmare for our content writers.
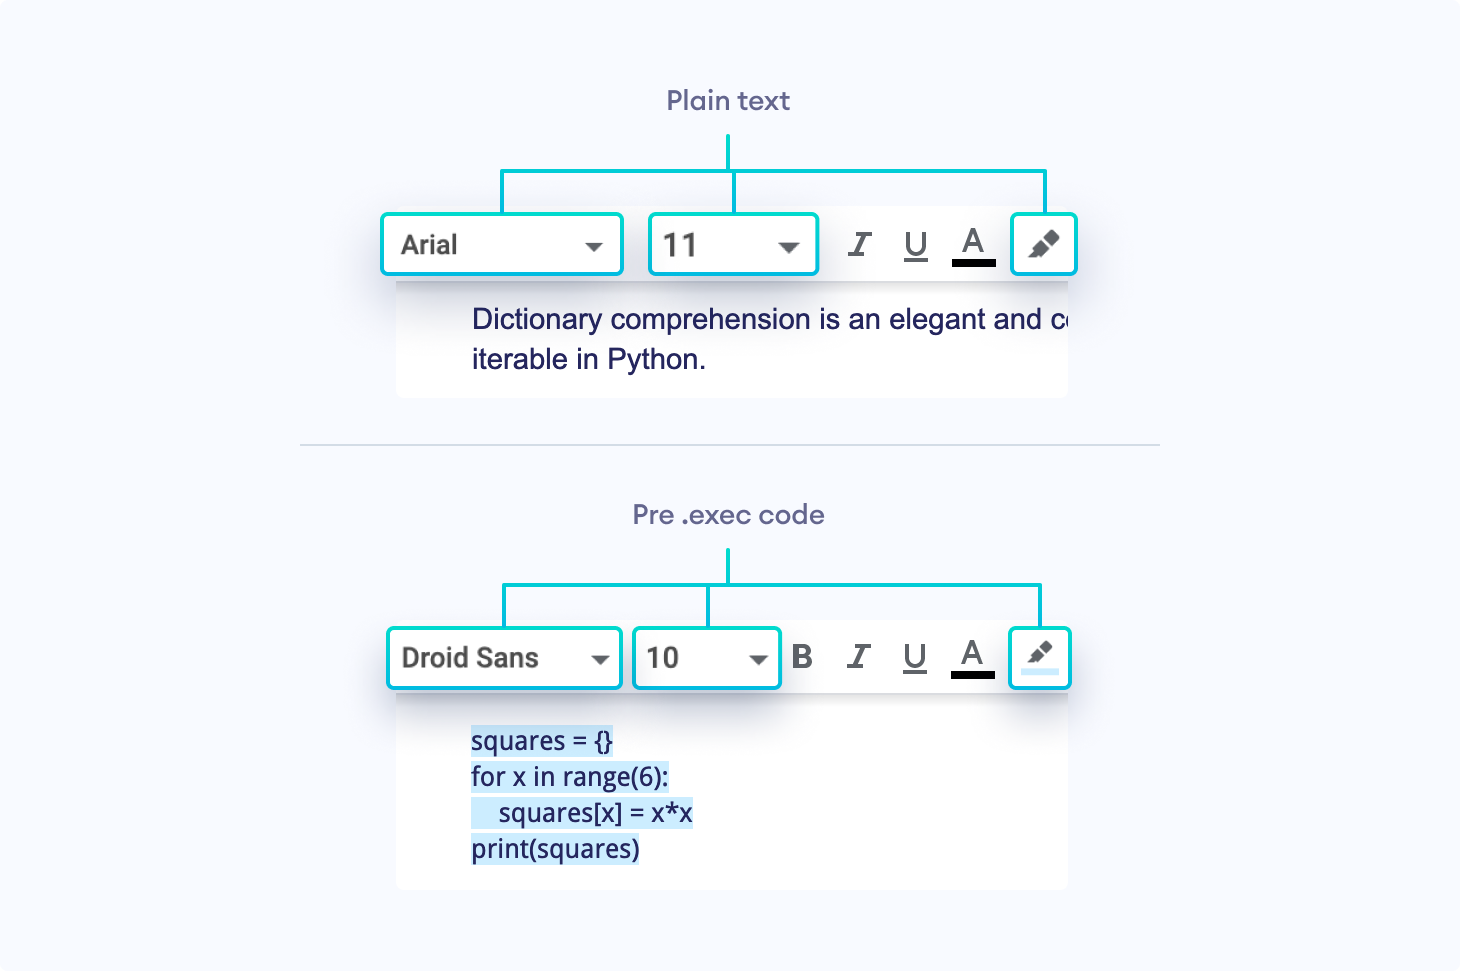
After some research, we found out that Google Apps Script (a Google scripting platform for G suite) could be embedded with Google Documents. These App Scripts could then be used to modify the Google Document and alter its User Interface.
Google Apps Script allowed us to change the User Interface of Google Documents. This feature came in handy while creating custom buttons in the Menu Bar to perform the styling tasks mentioned above.
Now, we could simply highlight the required text and perform styling options, like changing the font and color, or inserting predefined tables into the Google Document.
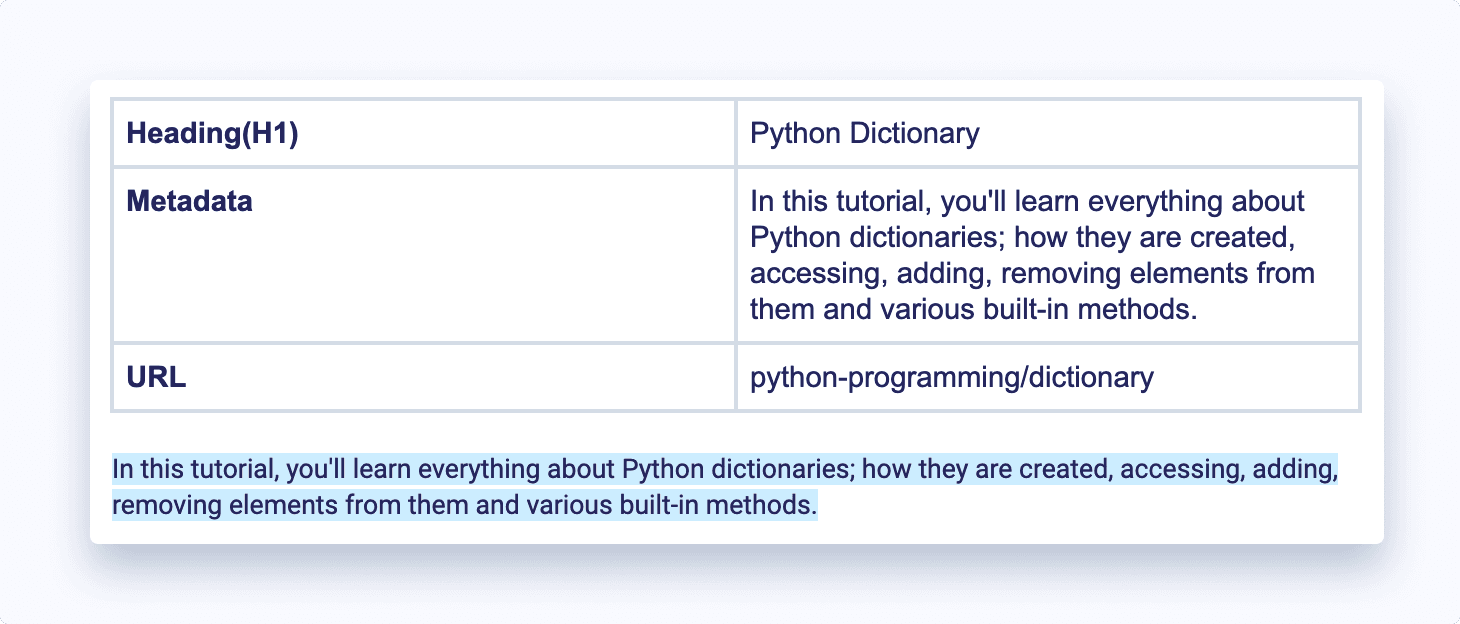
The feature to insert predefined table templates in the Google Document allows the content writers to add information about articles or images.
These special tables are parsed differently by our Python module. The Page Info Table, for instance, is used at the beginning of a Google Document for Web Page and Article Information:
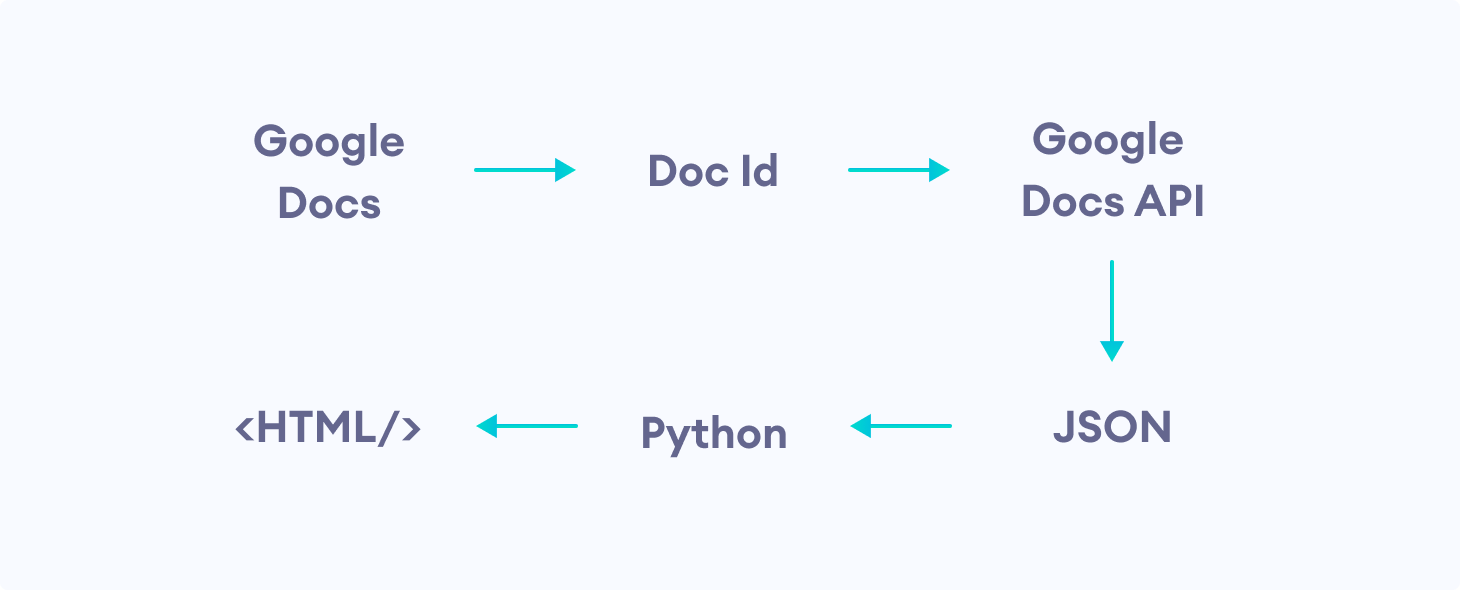
After we complete writing a properly formatted Google Document, we can use our Python module to send a request to the Google Docs API using the Document's unique DOC_ID. Google Docs API sends back a JSON response corresponding to the contents of the Google Document.
You can visit Google Docs API Response JSON to learn more about Google Docs API and its JSON response.
Our Python module in the backend then converts this somewhat disordered JSON into a structured HTML.
Let's look at how a preformatted code block is parsed by our Python module to generate the HTML content:
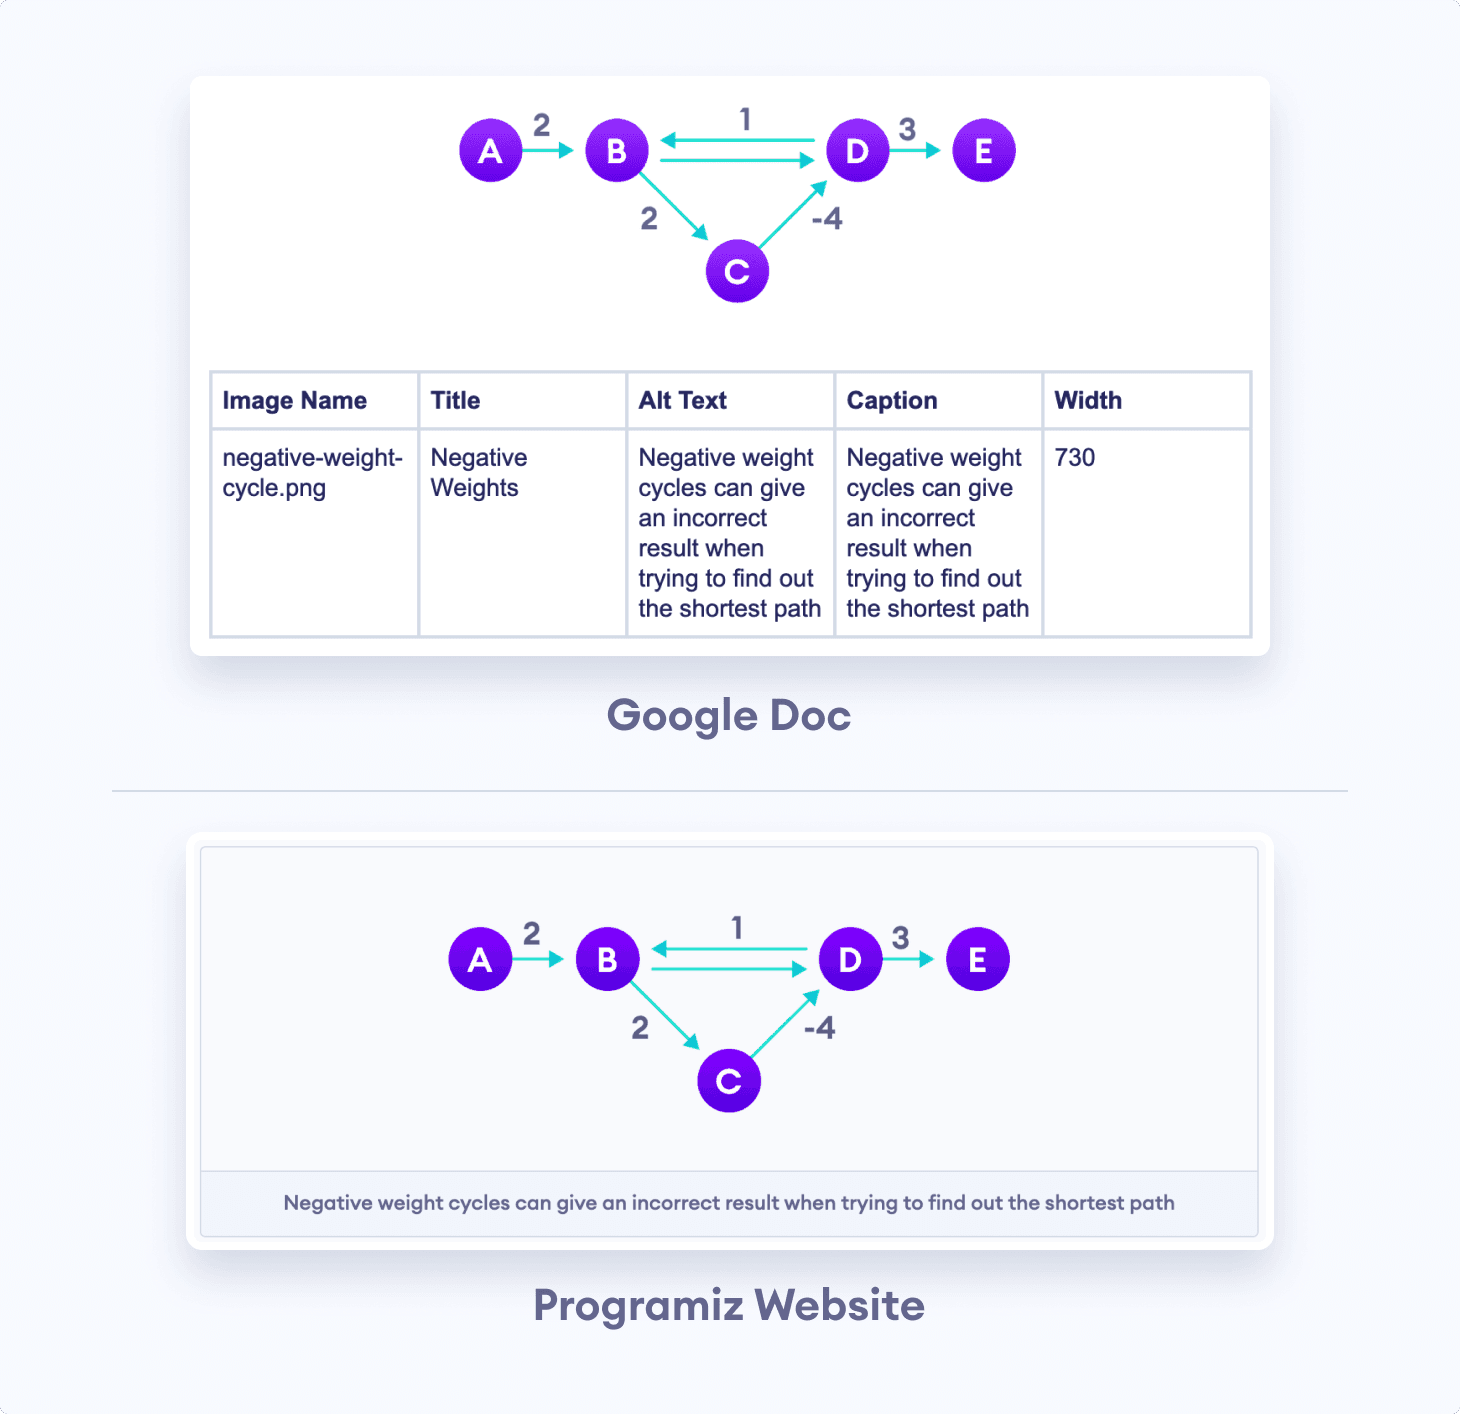
The Image Info Table mentioned earlier is parsed in the following way:
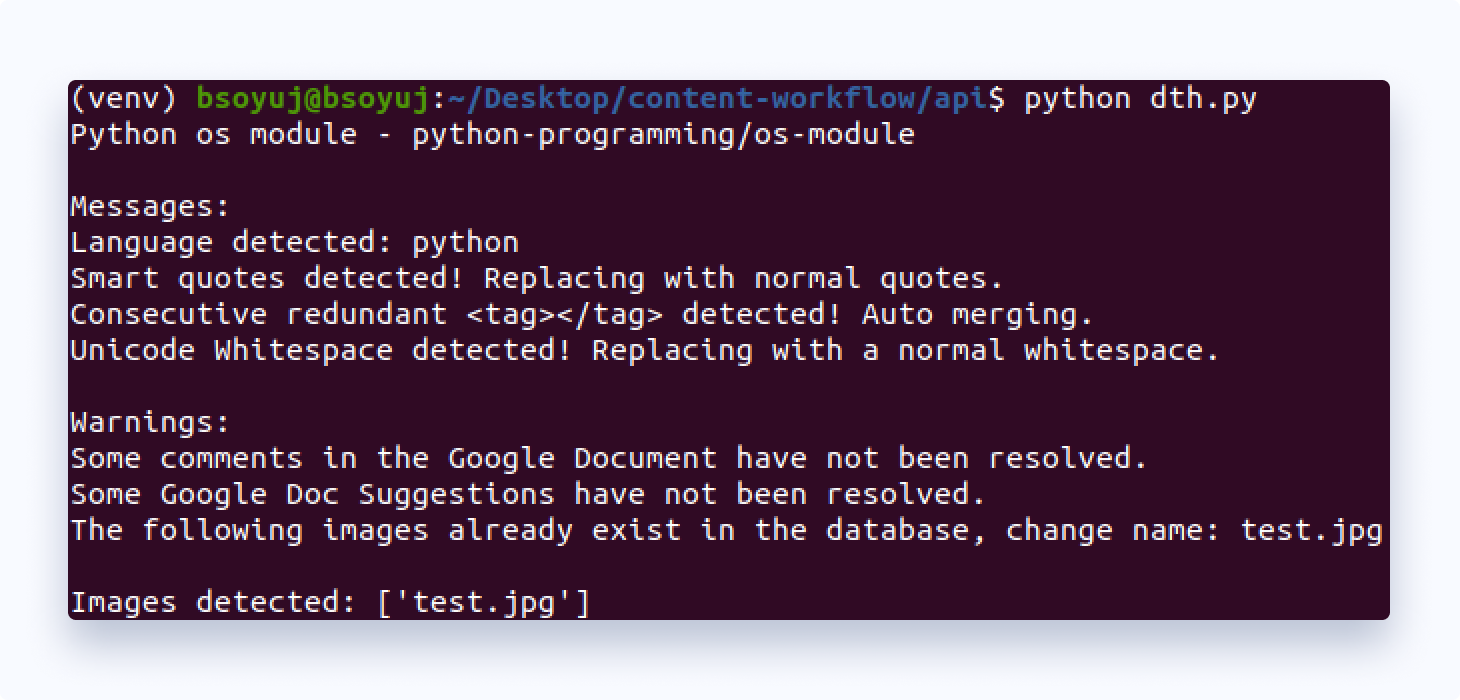
After completing these basic requirements, we further polished the docsToHTML module to perform a sanity check on the HTML produced from the Google Document. As of yet, the module does the following:
- Detects the programming language described in the article. (Some HTML semantics are language-specific)
- Checks if any image names clash with other pre-existing images.
- Replaces Smart Quotes and different Unicode whitespaces with normal ones. (can cause errors if they occur in code blocks)
- Checks if all Comments and Suggestions in the Google Document have been resolved. (warning if moderator reviews aren’t addressed)
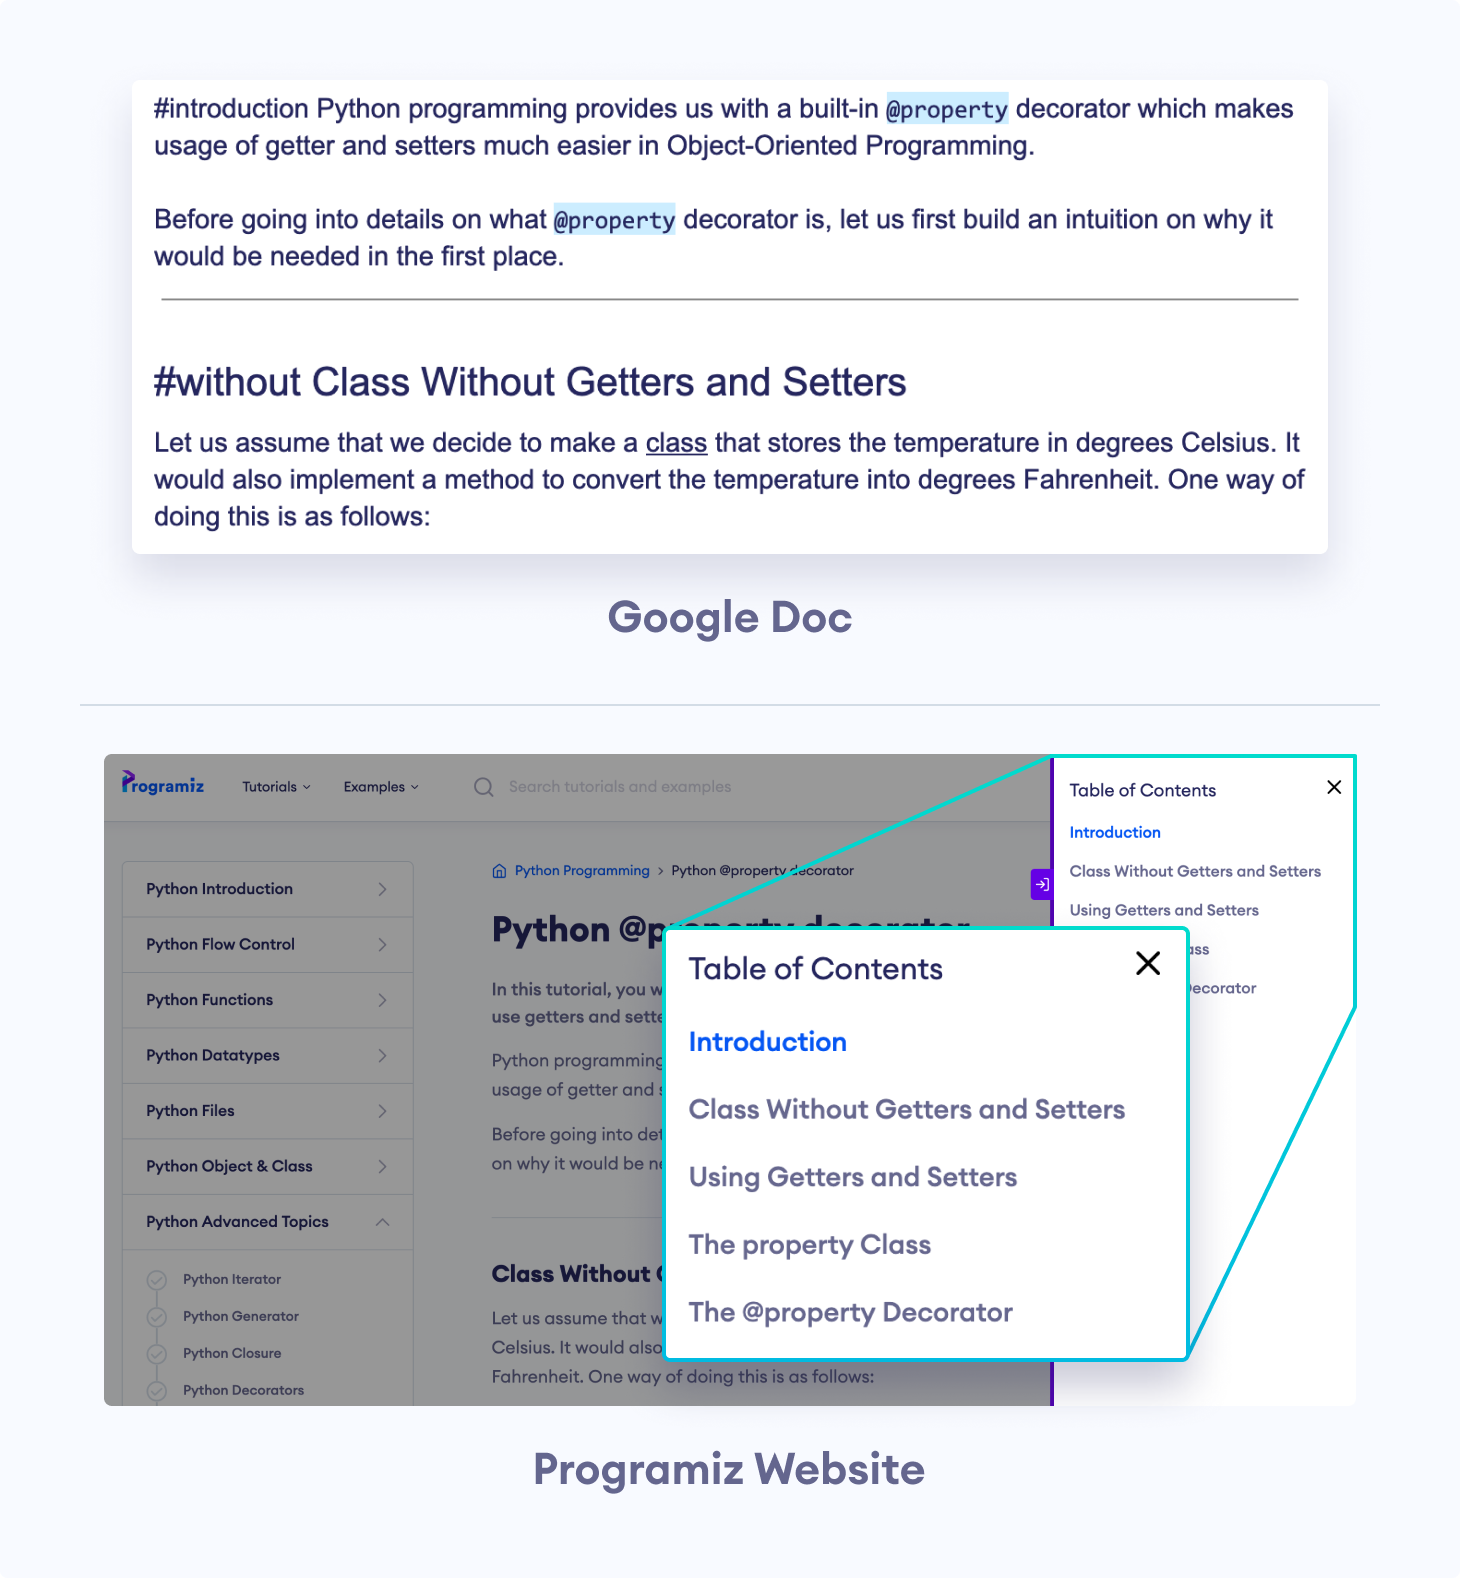
The Table of Contents bar that you see on the Programiz website is also automatically generated by docsToHTML:
HTMLToDocs: Converting HTML Contents To Google Document
After developing docsToHTML, we started writing our new tutorial articles in Google Docs and using it to convert Google Docs into HTML. Despite this, there were still a lot of old articles of which we only retained the HTML copies.
Since we strive for perfection, we constantly update our old articles by fixing technical and grammatical errors wherever necessary. We also rewrite obsolete sections of old articles with up-to-date developments in that certain topic.
Editing of these existing articles had to be done manually by changing their HTML as we did not have their Google Docs (docsToHTML could not be used). Rewriting the entire article in Google Docs was also not a very feasible solution.
To solve this problem, we introduced HTMLToDocs. HTMLToDocs is another Python module that converts raw HTML Content into a Google Document. It performs the exact reverse operation of the docsToHTML module.
HTMLToDocs takes in a Programiz Article Web Page URL and converts the tutorial content into a Google Document (what we would have originally written, had we used Google Docs). It is programmed to parse both of our old and new HTML semantics.

This Python module also uses Google Drive API to cluster HTMLToDocs generated Google Docs into a proper hierarchical structure in the user's Google Drive.
Using Google Docs, however, came with its own shortcomings. One of the major problems I faced while developing HTMLToDocs was that adding all the styling elements in Google Document with Python (in fact all supported programming languages except Google’s native Apps Script) was not intuitive. Moreover, some basic elements, like a Horizontal Rule, could not even be added. The Google Docs documentation was very ambiguous.
For instance, we can add a table in Google Docs using Apps Script with a structure similar to:
var cells = [
  ['CELL11', 'CELL12'],
  ['CELL21', 'CELL22']
  ];
var table = element.insertTable(index, cells);
If instead, we were to use other programming languages, we would have to send the following JSON request to the Google Docs API. For efficiency, the Document is written backward so that the text's length in each cell doesn’t affect the indices of the subsequent elements.
[{'insertTable': {'rows': 2, 'columns': 2, 'location': {'index': 2}}},
{'insertText': {'location': {'index': 13}, 'text': 'CELL22'}},
{'insertText': {'location': {'index': 11}, 'text': 'CELL21'}},
{'insertText': {'location': {'index': 8}, 'text': 'CELL12'}},
{'insertText': {'location': {'index': 6}, 'text': 'CELL11'}}]
Here, the index of any cell is given by the formula:
4 + TABLE_INDEX + (1+ NO_OF_COLUMNS * 2)* CURRENT_ROW + 2 * CURRENT_COLUMN
This is not mentioned anywhere in the API documentation.
Nonetheless, we managed to get around these hurdles to bring HTMLToDocs to life.
Content Workflow System: Bringing Everything Together
Now that we had completed the full cycle of converting Google Docs to HTML and HTML back to Google Docs, we were ready to take this project one step further.
Previously, every content writer had to set up a Python environment and install various dependencies on their local machine to run docsToHTML and HTMLToDocs. They also had to keep track of the Google Document ID to run these scripts.
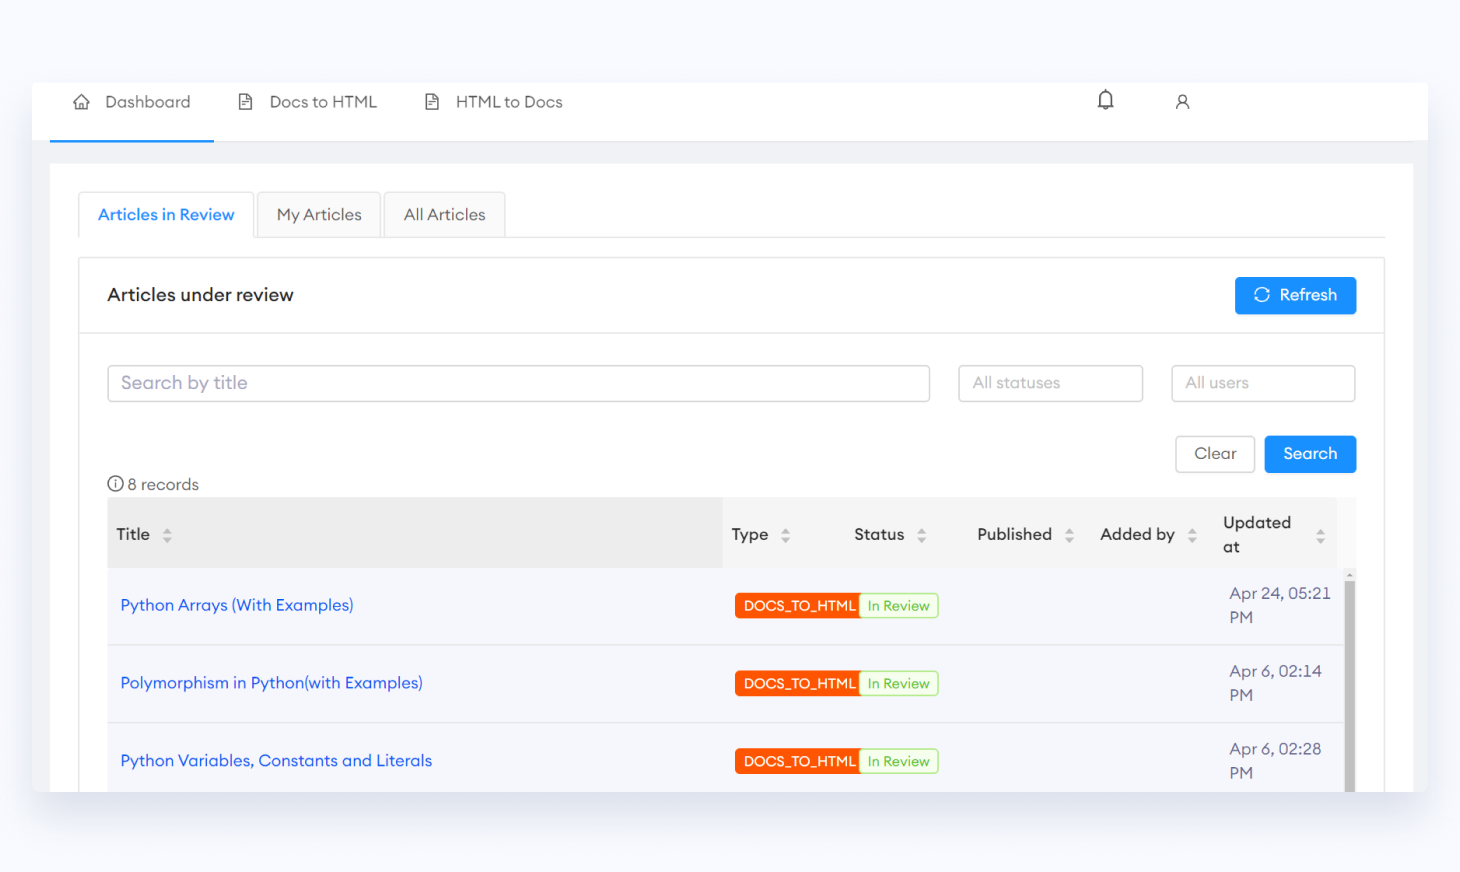
The Content Workflow System was developed to bridge docsToHTML and HTMLToDocs together. It would also keep records of every entry made by the user. We could then use this tool to write, edit, review, and publish content on the Programiz website.
First of all, we converted the docsToHTML and HTMLToDocs modules into an API and hosted them in the cloud. Next, we built a User Interface to send requests and retrieve responses from this API.
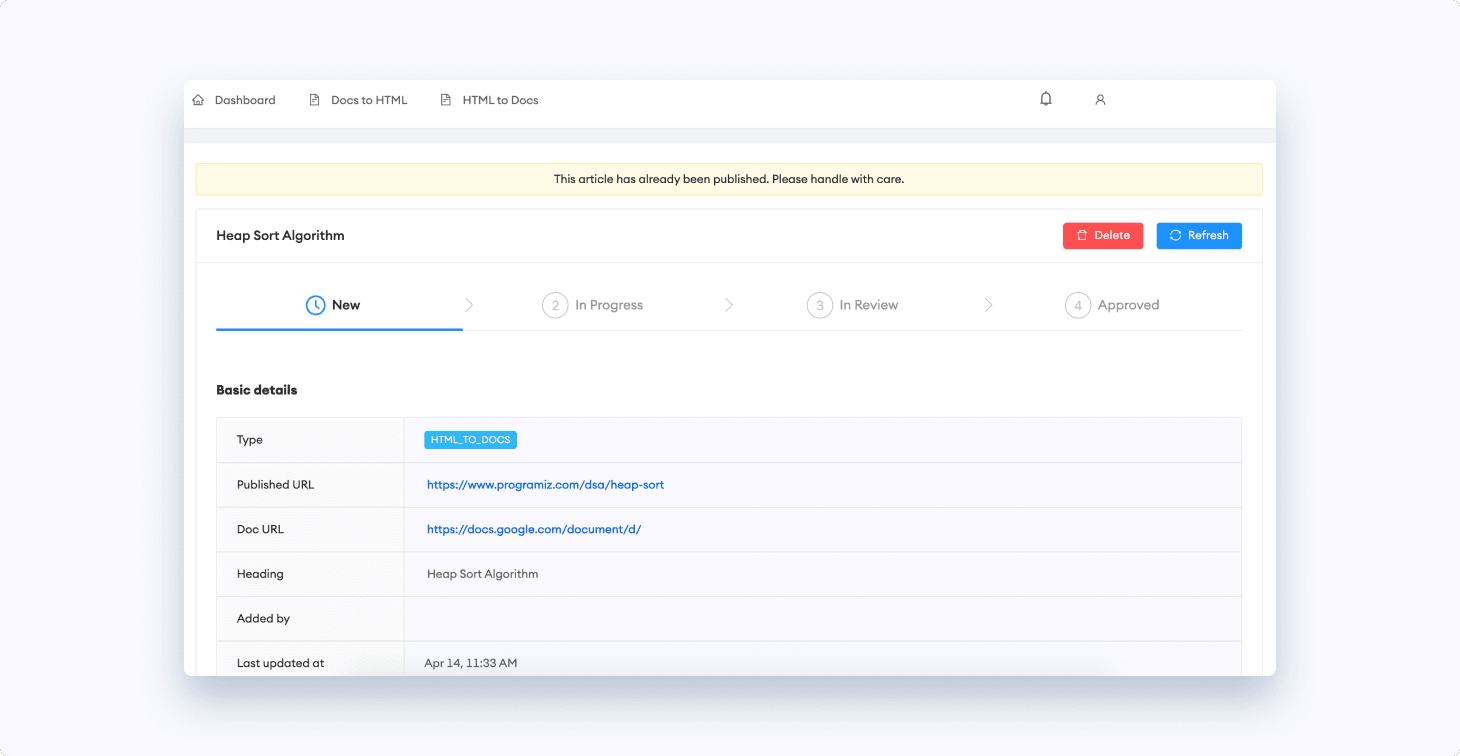
The users can log in to Content Workflow System (CWS) with their Programiz credentials. They have the option of using either docsToHTML or HTMLToDocs. For either case, the endpoint is docsToHTML to generate the HTML Content.
When the user submits an article, it goes to the review section. Reviewers can review the article and approve it or send it back to the user for further editing (suggestions and comments are handled in the Google Document itself) and the user is notified accordingly.
The reviewed article, along with images, can finally be uploaded to the website with our tool. The article will go to revision and can be published by the admin or the moderator.
The Content Workflow System has gotten exponentially better since its first release. However, it is far from perfect, and there are always some occasional errors that go unhandled. Even so, we have managed to solve most of our problems with this tool, and the content writing process has been more flawless than ever.
Final Words
Creating your own Content Writing Tool can seem like a daunting task at the beginning. It will take time to get used to the quirks of how different services like Google Docs handle information and how we can use them to our advantage. You are sure to encounter loads of unintended errors along the way.
However, I believe it is well worth the effort if you really want to add custom features to your Content Writing Project (or any other project, for that matter) and save yourself some nasty inconvenience in the future. Moreover, you come out learning more about what actually happens under the hood of various services & frameworks and why things work the way they do.
P.S. HTML Content for this blog post was also generated via docsToHTML.
Subscribe to Programiz Blog!
Be the first to receive the latest tutorial from Programiz by signing up to our email subscription. Also more bonus like inside looks on the latest feature and many more.